As a lightning rod installer, when we finish a lightning protection installation, we often have the impression that « everything is in place ». Yet, the real turning point is the LPS reception report. Without it, compliance is debatable, warranties become unclear, and maintenance starts on uncertain ground.
In the field, a good report acts like a family photo, it captures the actual state of the system on that day. It serves the installer, the client, the inspection bureau, and the maintenance team equally. We will present a simple model, then list the documents to attach and the photos to keep, with concrete archival rules.
What an LPS reception report is for, and what it must contain
A reception report is not « just paperwork ». It dates the end of work and frames acceptance, with or without reservations. In France, reception is not mandated by a single text in all cases, but it remains key to activating and securing warranties (defects liability, two-year, ten-year depending on the contract context), particularly the client’s responsibility in accepting the lightning rod installation. Without a written document, reception can become implied if the work is taken and paid for without objection, which opens the door to misunderstandings.
For an LPS, we must also avoid a frequent confusion. The reception report is not the periodic verification report, nor a simple measurement log. We write it as a summary, which refers to technical appendices (plans, measurements, manuals, handover documents) and validates the results of the lightning risk analysis conducted during the study phase. This is where we rely on the requirements of the NF EN 62305 standard (external and internal LPS) and the electrical framework, including NF C 15-100 for everything related to surge protectors, panels, and equipotential bonding.
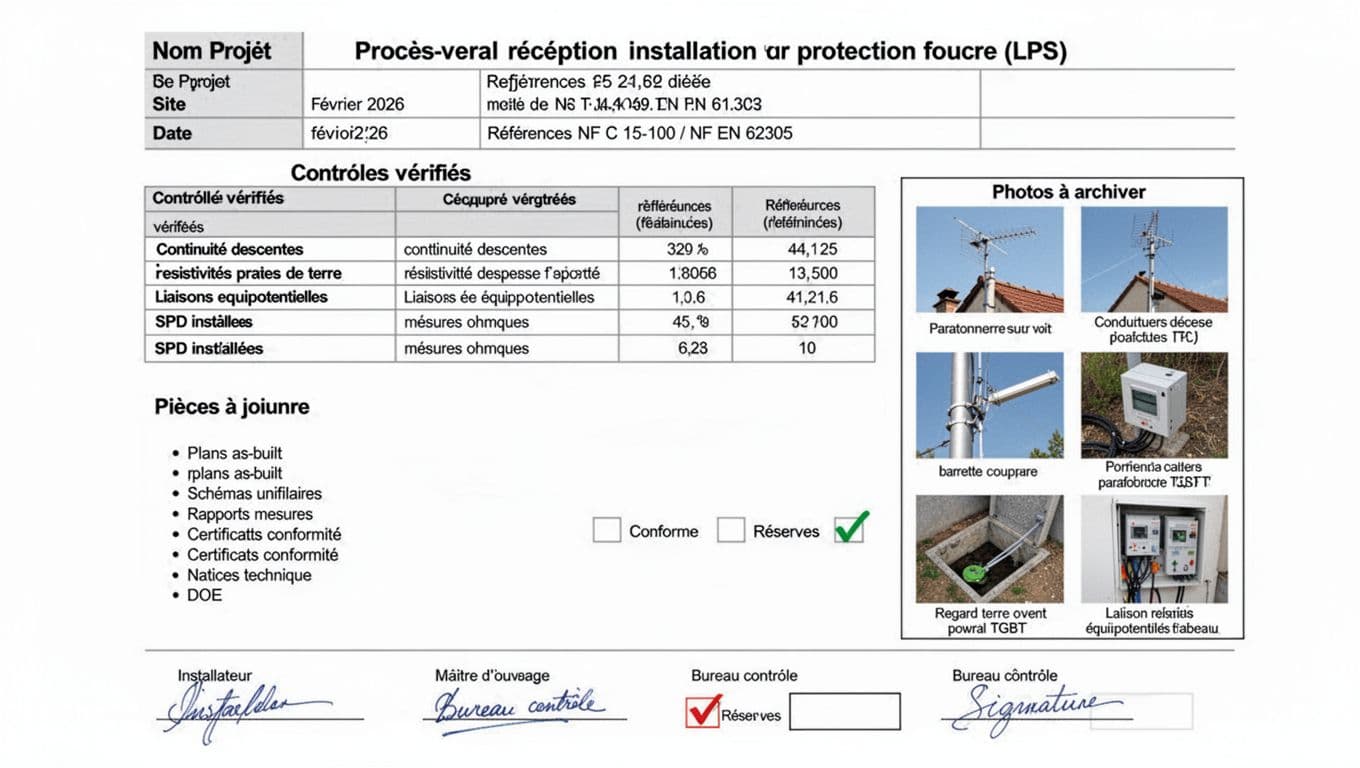
Here is a structural model that works well in installation and inspection, and can be adopted in our records (we then adapt it in our wiki and project sheets on lpsfr.com) :
- Header : project, site, address, date, stakeholders, references (contract, plans), applicable standards (ex. NF EN 62305, NF C 15-100).
- Scope of reception : type of LPS, protected zones, limits (building A, carports, antennas, networks).
- Controls performed : continuities, equipotential bonding, earthing, identification, surge protectors (SPD) installed, tests and measurements.
- Result : compliant, or compliant with reservations, or refusal of reception with justification.
- Reservations : clear wording, location, associated requirement, timeline, responsible party, need for re-measurement.
- Signatures : installer, client or project manager, inspection bureau if present, plus date and location.
Point of vigilance : signing the reception report as initial verification to ensure regulatory compliance, without usable appendices, becomes fragile in case of loss. We sign, but we sign with evidence.
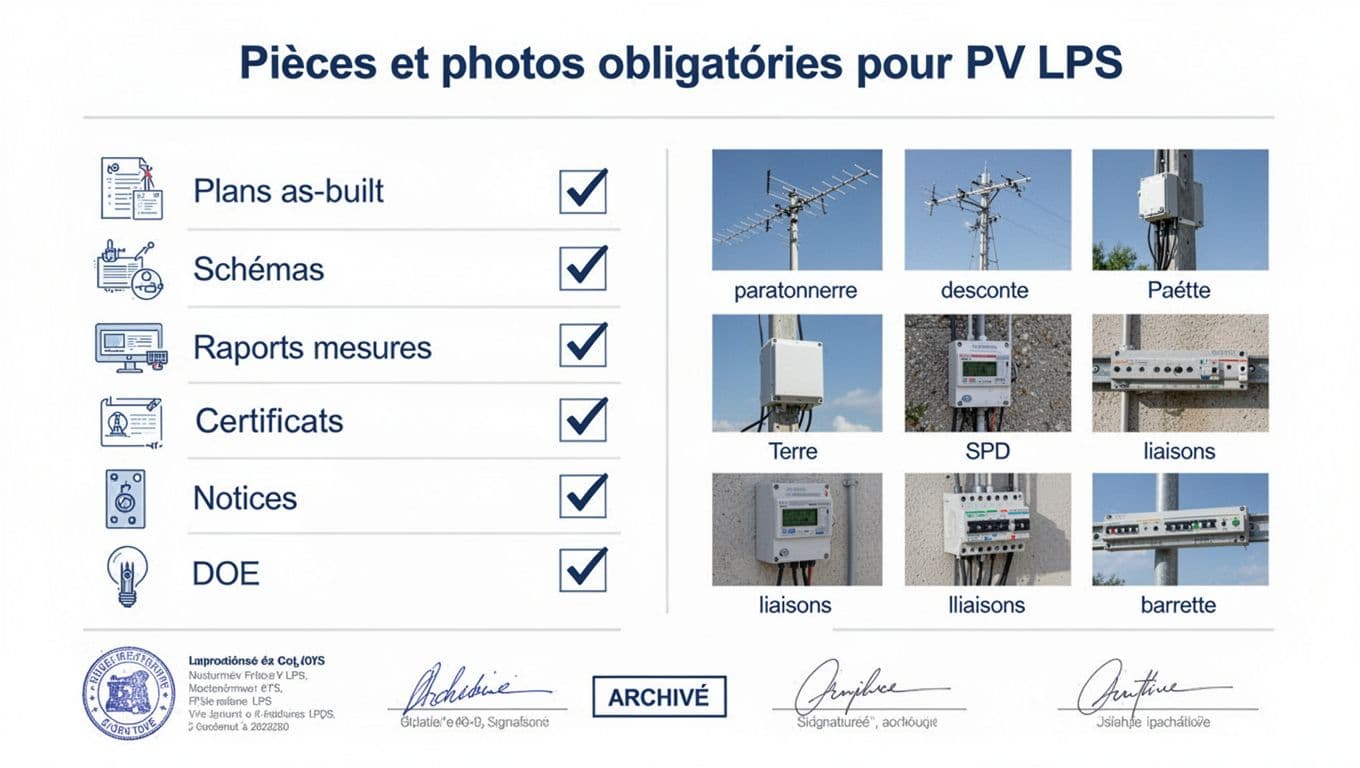
Documents to attach to the report : the file that counts as proof
We save time when we think « technical file » rather than « administrative documents to attach ». The report must remain readable, so we put details in appendix, and we reference each appendix with a code (A1, A2…). This also allows, years later, to understand why a choice was made, or why a reservation was made.
The exact content varies by site, but we almost always find the same base for lightning protection, whether it’s a mesh cage or a lightning rod installation equipped with a lightning rod with early streamer emission device. On the electrical and surge protector side, we align with applicable installation rules. To get back on track with the framework, we can review solid guidance on the standard, for example this NF C 15-100 regulatory guide (2025 edition) or practical recap on key points of NF C 15-100. For SPDs, useful guidance also exists on surge protector requirements and choices.
We can organize the technical file appendices as below, which facilitates audits and multi-site maintenance :
| Appendix to attach | What it is for | Concrete examples |
|---|---|---|
| Plans and « as-built » | Prove existing conditions, prepare maintenance | Roof capture plan, conductor runs, earthing plan, terminal identification |
| Electrical schematics | Understand internal protection | Single-line diagram TGBT, SPD surge protector placement, equipotential bonding |
| Resistance measurement reports | Objectify compliance | Electrical continuity measurements, earthing measurements (method and conditions), recorded values |
| Technical sheets and certificates of conformity | Justify the materials | SPD surge protector notices, manufacturer conformity certificate if provided, references installed, torques if required |
| Handover documents and procedures | Transfer operations | Control instructions, periodicities, access points, safety instructions |
The good reflex is to add a « job completion checklist » appendix before lightning protection reception. Even if it targets electricity, a NF C 15-100 self-check sheet provides useful logic, which we adapt to LPS (access, identification, continuities, SPD, grounding).
Photos to archive : framing, naming, retention duration
Photos to archive are like measurements; if they are not contextualized, they are worth little. We therefore archive « useful in dispute » and « useful in lightning maintenance » images. The goal is not to have 200 photos, but 20 to 40 clean, well-framed, and retrievable photos.
We recommend archiving at minimum the following views for visual control, with a wide view then a close-up view :
| Photo to take | Details to show | Why we keep it |
|---|---|---|
| Capture elements on roof (tip, cable, fixings) | Protection zone marker, fixing, condition | Prove placement and accessibility |
| Down conductors | Run, mechanical protection, fixings | Facilitate inspections, prove physical continuity |
| Isolation link(s) | Position, identification, accessibility | Prepare future measurements, avoid « missing » elements |
| Earth pit(s) | Connection, cleanliness, closure | Prove condition on reception date |
| Equipotential bonding | Connection point, visible section, identification | Avoid disputes over mass grounding |
| SPD at panel (TGBT or sub-panel) | Reference, wiring, upstream protection | Document internal protection, prepare replacement |
For archival to truly serve, we set a simple naming rule :
- Site_Building_Equipment_Date (ex. PARIS-B12_IsolationLink_BC-01_2026-02-15)
- We add the view (WIDE, DETAIL) and the level (ROOF, GROUND, TGBT).
- We keep the link to the plan or marker (D02, TGBT-1, RT-03).
- We store the original and a compressed version for sharing, directly in the maintenance log.
As for duration, we align retention with the site’s lifetime and responsibilities associated with the work. In practice, we keep reports, appendices and photos long-term (useful for lightning maintenance), with redundant backup. On lpsfr.com and in our practices with LPS Manager, we favor archival by equipment (lightning rod, conductor, earth, SPD), because search becomes immediate during an audit.
Field tip for lightning protection : the most valuable photo is the isolation link with its visible marker. It saves a half-day of searching.
Conclusion
A solid LPS reception report is a clear, signed, and provable file. We include a clear summary, attach the documents that count as proof, then archive targeted and retrievable photos. This document establishes the periodicity of verifications for optimal future safety. If we take an extra hour on reception day, we save ten during a verification report, an extension, or after a strike on the lightning protection. The next time we close a lightning rod installation job, we ask ourselves just one question: will a team unfamiliar with the site be able to understand and verify the installation in 5 years?
To learn more, discover LPS Manager pricing and download the app.